In January 2011, I epanded the original solar system installation with four additional solar panels, re-did the wiring, and moved the solar charge controller. You can read about this expansion at the end of the article.
When we purchased our new 2010 Tiffin Phaeton motorhome, there was NO WAY I was going to leave most of the modifications I had made on the old Dolphin motorhome. Prior to picking up our new Phaeton from the dealer, I removed the solar panels, the solar charge controller, the Internet satellite system, the AGM batteries, and the toad brake control system. After owning the Phaeton for a couple months, I found time to reinstall the solar system. This system is the same as what was installed on the Dolphin motorhome. You can read about that install here.
The system installed on the Phaeton includes:
- Four Kyocera 120 watt solar panels, providing a maximum of 28.4 amp/hrs.
- A Blue Sky Solar Boost 50L solar charge controller with remote display. This controller handles 50ah, which will allow for expansion.
- Six LifeLine AGM 6-volt batteries, model GPL-4C. Cabled in series to provide 12 volts and in parallel to provide 660 amp/hrs.
- A TriMetric TM-2020 battery meter, with 500 amp shunt. This provides precise details on battery condition and usage. Specifically, details on actual amp/hr usage.
- The Phaeton already came standard with a Xantrex 3000watt inverter and 400amp catastrophe fuse.

Before I could reinstall the solar system, I needed to purchase a few items that I left on the old motorhome (wouldn't have been right to leave it with big holes). A replacement solar controller remote display, the TriMetric battery meter and 500 amp shunt, and wiring were ordered from Wind and Sun in Flagstaff, AZ.
There were five major steps in the solar panel system reinstallation:
1. Mounting the Solar Panels:
Finding space on the roof for the panels was a breeze. I figured there's room on this 40' Phaeton for TWELVE solar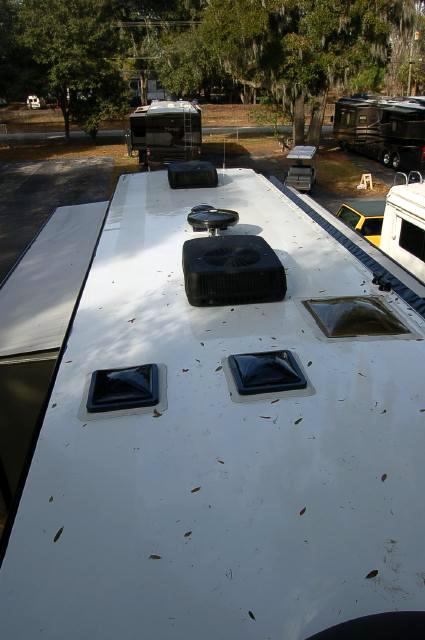 panels. I'm only installing four. I placed all four near each other on the Driver Side, near the rear. Placing them together on the same side of the coach will allow us to tilt the panels facing south and not have any shadows on them, if we park the coach facing west. During the winter, when the sun is lower on the horizon, tilting the solar panels results in about a 15% gain. I've done this many times when parked for an extended period while spending time in the desert. When I first purchased the solar panels, I insured I also got rooftop mounting brackets that included bars that allowed tilting of the panels.
Attaching the mounting brackets to the roof was an easy step. Just mark the correct location and screw them down. I used 1" JAX screws. I made sure I had enough room between panels to access the attaching bolts, which are removed to tilt the panels. I then liberally covered the brackets and screws with self-leveling sealant (Dicor).
2. Mounting the Solar Charge Controller:
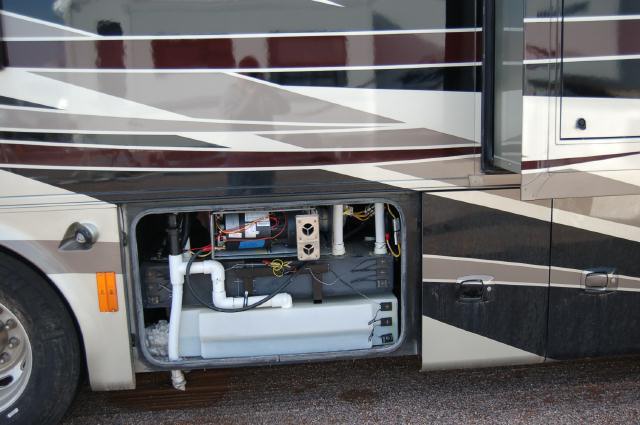
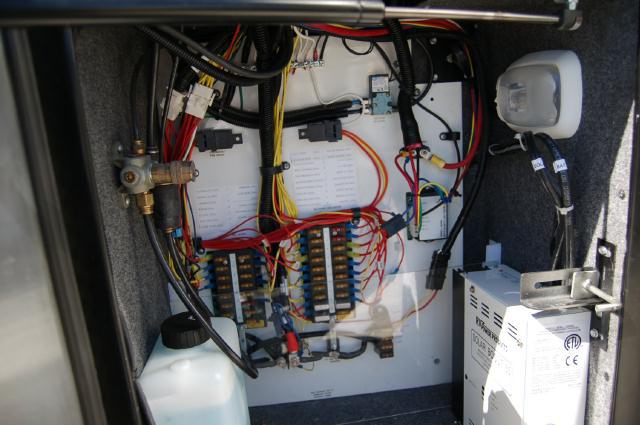 I decided to mount the charge controller in an electronics bay in the front, driver’s side basement. I relocated the windshield fluid bottle to the left side of the storage bay, which left an empty wall for the charge controller on the right. This was all done very easily. I then drilled a few holes in the compartment to run wiring from the solar panels, wiring to the batteries, wiring to the temperature sensor on the batteries, and wiring for the remote display panel. When all the wires had been run, I sealed the holes with silicone.
3. Wiring the Solar Panels:
I used outdoor AWG 10 wiring this time to wire the panels to the controller. In addition, I wired two pairs of solar panels in 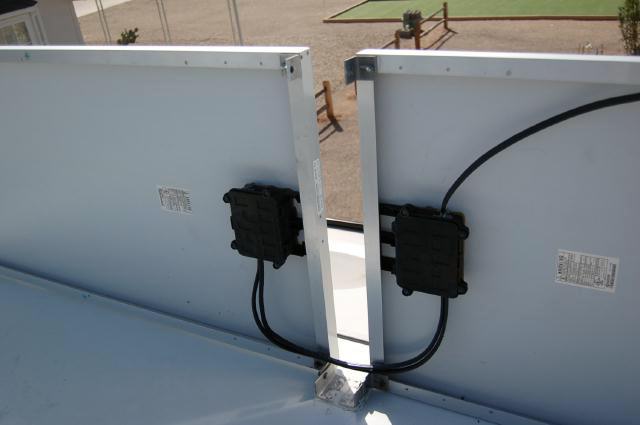 series to make a 24volt/7amp pair and then wired the two pairs in parallel to the charge controller. This results in the solar input being 14amps at 24volts. The Solar Boost 50 can be configured to accept a 24volt input, but have a 12volt output. This is a more expandable method of wiring, allows the use of thinner wiring, and is more efficient for the MPTT "boosting" of the charge.
Research taught me to insure I used a Pulse Width Modulation (PMW) multistage charge controller. The charge controller's job is to control the charging of the batteries from the solar panels. Depending on the state of charge of the batteries, the controller will "Bulk" charge the batteries, then taper the charge down to an "acceptance" (or absorption) charge, and finally "float" the charge once the batteries are charged. With AGM batteries, it's also very important to NOT over charge them. I also needed a controller that could handle my 28.4 amps (max possible) from my 4 solar panels. I could have selected a 30 amp controller, but this wouldn't allow for any simple expansion of the system. I decided to use the Solar Boost 50, which can handle up to 50 amps. It also has the advantage of being a Maximum Power Point Tracking (MPTT) charge controller. Basically, this technology can increase the charge current up to 30% compared to a traditional controller. Simply put, the solar panels put out 16.8 volts. But the batteries use a maximum of 14.3 volts to charge. MPTT technology converts this extra voltage to additional amperage for charging. For example, the solar panels may be putting out 20 amps, but the charge controller could boost this to 26 amps to the batteries.
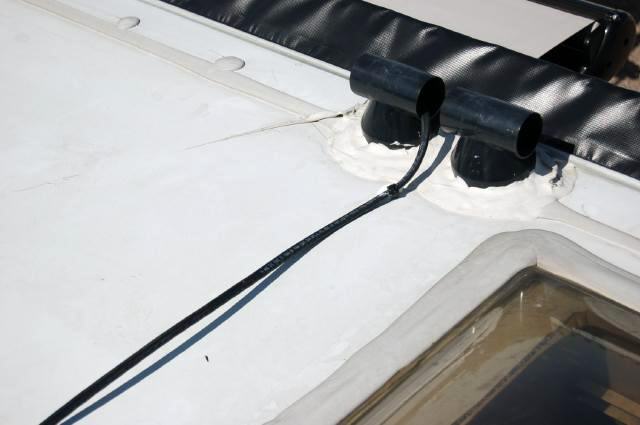
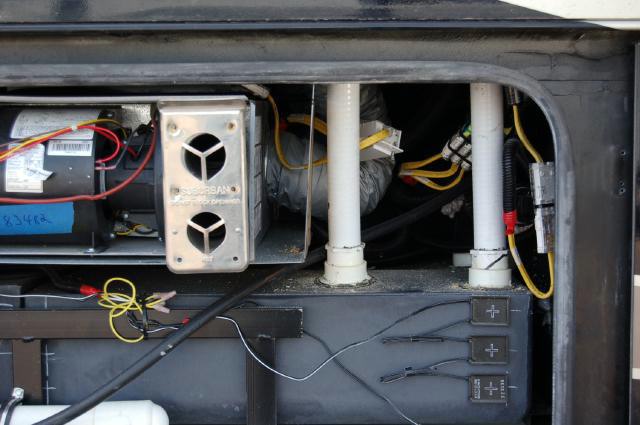
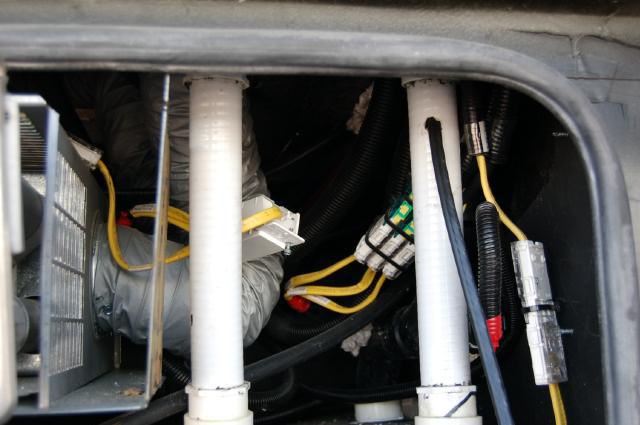
Running the wiring from the rooftop mounted solar panels to the basement mounted charge controller was the most difficult step of the entire reinstallation. I ran the wiring from the roof down the gray water vent pipe, which was an easy and direct route to the basement. In the basement, I drilled a hole in the grey water vent pipe to access the solar panel wiring. Once the wiring was ran through the vent pipe, the access hole was sealed. The wiring was ran and tied up through the middle of the basement. I had to drill another hole in the front basement wall to continue running the wiring to the front of the coach. Tiffin does a pretty good job of sealing the basement. I couldn't find any holes out of the basement to run the wires through, without making my own hole. The wiring continued to be ran (and tied up) along the chassis frame to the front electronics bay and charge controller.
 |
 |
 |
 |
4. Installing the TriMetric battery meter shunt:
Installation of the battery meter isn't needed for the solar panel system. However, the information provided by the battery meter is invaluable when dry-camping for extended periods. In addition to many other features, I primarily like monitoring the actual amp/hr consumption. With this meter, i can see how much amp/hrs we're using at any one moment. It's interesting (and scary) to see the microwave turned on and start sucking the batteries down at over 150amps an hour when on the inverter. You learn not to do that too often. In the Dolphin motorhome, we could watch TV and be on the computers for over 4 hours in the evening and use 130amp/hrs. This is about 25% of our battery capacity. Using more than 50% of your battery capacity greatly reduces their lifespan.
With the battery meter, you can see how many amp/hrs any device or light uses when on inverter. With the new Phaeton, we have a residential fridge and are GREATLY concerned on much power it will draw while on inverter. I have yet to monitor and 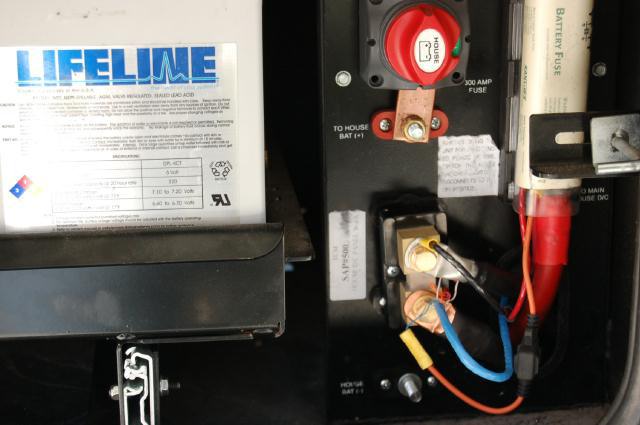 test it. By telling you how much amps you've used, the battery meter is also telling you how many amps are still needed to be fully charged again. With the solar system, you can quickly see how the charging is going. Many gauges and people use voltage to determine how weak their batteries are. Monitoring amp/hrs is MUCH more precise.
The battery meter requires a "shunt" be installed before the negative battery cable. The meter itself is connected to this shunt. I mounted the 500 amp shunt in the battery compartment. The negative battery cable was moved to one side of the shunt. I made a new 3' battery cable with 2/0 welding cable and ran it from the shunt to the negative battery post. This placed the shunt in line with the negative connection to the battery.
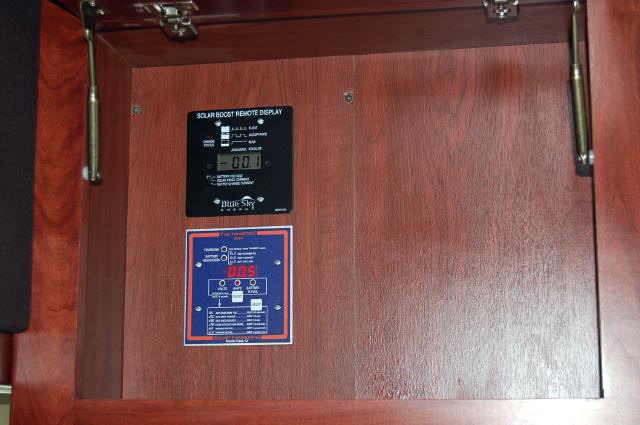
5. Mounting the remote displays:
The Phaeton has a large cabinet above the driver’s seat with all the electronic controls and display panels for the inverter/charger, the tanks displays, awning controls, etc. I wanted to redo this cabinet and include the additional displays for the solar charge controller and the battery meter. However, I couldn't figure how to access and remove the cabinet back. I decided to take an easier route and use an empty cabinet above the driver’s seat. This cabinet is within a foot of the other display cabinet, so all display panels are next to each other (sort of). It also had a back that could be easily removed and allow easy access to run the wiring.
 I could easily run the wires from the ceiling cabinets to the floor. There was access in the corner of the windshield, as well as a plastic cover to hide the wiring. However, I couldn't find access from the floor to the basement. Everything seemed sealed pretty good. So I drilled a small hole through the floor. After running the wires through the hole, it was sealed on both sides with silicon.
The mounting of the Solar Boost remote display and the TriMetric battery meter was easy into the cabinet wood back. The charge controller remote display has its own wiring. 24gauge twisted pair was used for the battery meter and were ran to the battery compartment. Once the wires were attached, the back was screwed back on the solar panel reinstallation was complete!
January 2011 Expansion:
After living in the new Phaeton for almost a year and spending the summer with minimal electric, the existing solar system had been working well. During sunny days, the 480 watt solar system could operate the electric residential refrigerator in the Phaeton and provide a small charge to the batteries. However, it was this "small charge" to the batteries that I didn't like. The 480 watt solar system could provide a maximum of 30 Amps/Hour under ideal conditions. While this was working, the batteries were not getting fully charged by evening. This was primarily do to the requirement to run the inverter all day (to operate the fridge) and we're not in an optimal RV site for the solar panels (little sun). Since I had room on the roof of the Phaeton for additional solar panels, I decided to double the solar array size.
After doing the research, I verified my 50amp Solar Charge Controller could easily handle additional solar panels. When driving through Quartzsite, in December 2010, we purchased four Kyocera 130watt panels, 4AWG wiring, and a few other minor parts. The Kyocera panels were about $450 each, which is a good price. I originally paid over $500 each for the 120watt panels. The technicians at the shop reviewed my existing system and suggested I increase the size of the wiring form the solar panels to the controller. I had made the mistake of installing the wrong size wiring when I installed the solar system on the Phaeton. I increased the wiring to 4 gauge, which is pretty thick wiring. To also help with keeping the wire distance shorter, they suggested I move my charge controller. The less distance the wiring goes, the less power loss there will be.
Solar Panel Installation:
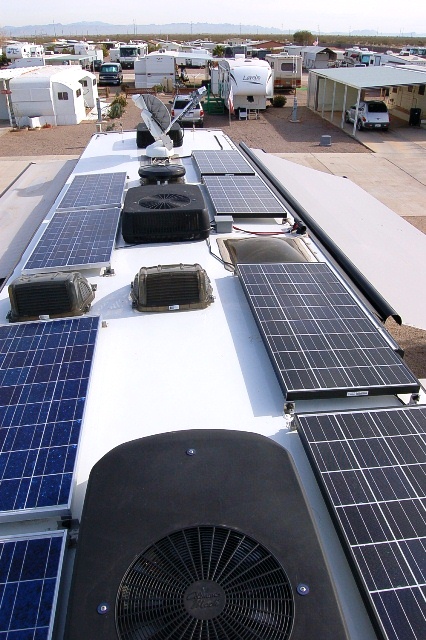 |
This was a pretty straight forward install. The four additional panels were install along the passenger side of the Phaeton. I used roof mount brackets that allow tilting the panels. The panels were wired in pairs for a 24volt output using the old 10gauge wire. This wiring runs a short distance to a distribution block. |
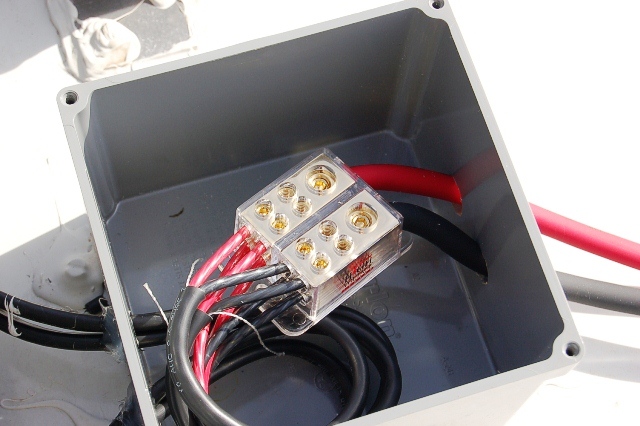
Distribution Block:
I wasn't happy with the original way I wired the original four solar panels. This time, I installed a power distribution block in a waterproof electrical box on the roof. The four PAIRS of solar panels (8 total) all terminate at this distribution block. The output from this block then uses the 4gauge wire to the solar charge controller. This provides a 24 volt system with a maximum of 30 amps. The Solar Boost charge controller then has an output of 12 volts with a maximum of 75 amps using MMPT. This more than doubles my previous solar charging capabilities.
 |
 |
Wire Run:
With the assistance of my technical partner (Connie), we removed the old wiring and ran the new 4gauge wiring down the gray water vent pipe to the basement. Although this wiring was very flexible, we did have some trouble getting it to come out of the pipe. We ended up tieing a string to the wiring, ran the string down the pipe, then pulled to allow the wires to get through. This worked great.
The wiring was ran through the basement of the Phaeton (same as before) and terminates at the solar charge controller. Another piece of this same wiring was used to go from the charge controller to the batteries.
Solar Charge Controller:
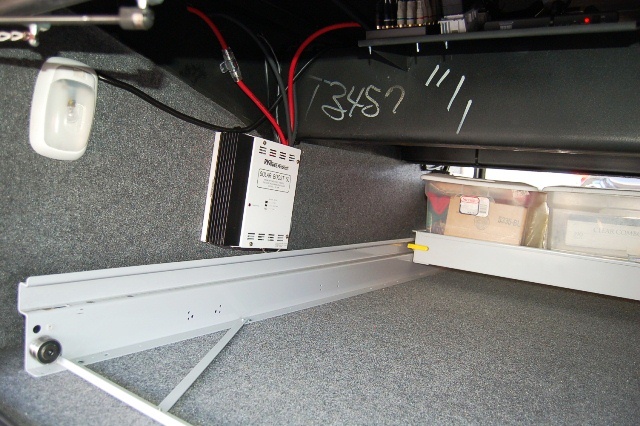 To reduce the distance the wiring from the solar panels had to run, and to place the charge controller closer to the batteries, I moved the charge controller. The new location is just on the other side of a wall from the battery bank, located in the first basement storage bay. This bay has a sliding tray installed, but the charge controller mounted on the wall is not in the way. This is the PERFECT location for the charge controller. I drilled a couple holes through the wall to the batteries for the wiring. In addition, for safety, I also installed a 60amp fuse from the charge controller to the batteries on the positive lead.


Follow