Prior to August 2004, our motorhome didn't have an inverter or solar charging system. Without electrical hookups, we would have to run the generator even to watch TV. I did start using a small 300 watt inverter on the television, but this was very limiting. When we sold the house, I used some of the profits to install a complete photovoltaic electrical system, which includes:
|
|
|
|
|
|
|
|
This is the wiring schematic for the entire system.
Electronics Compartment:
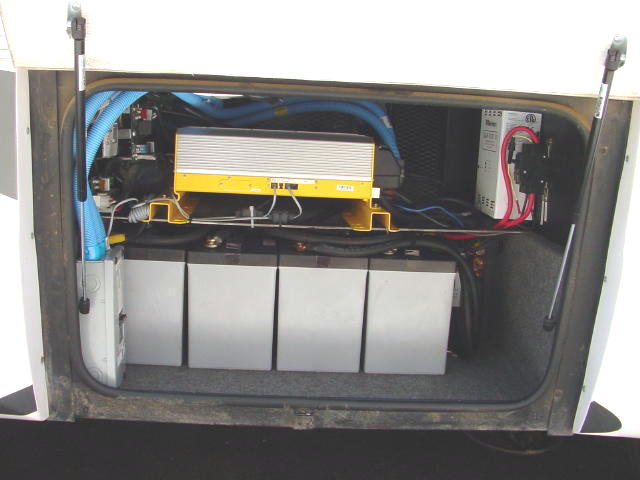
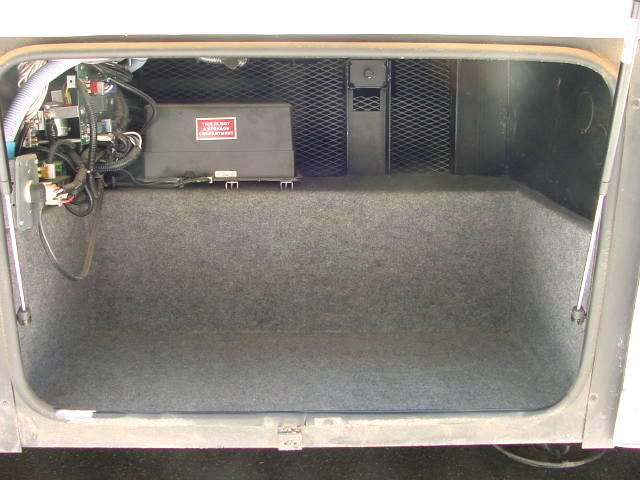 My electronics compartment was located near the existing two batteries and also held the 110v to 12v converter. I thought this would be the perfect location for all of the electronics and hold additional AGM batteries as well. All the electronic components fitted nicely into this compartment. The first picture show the compartment as it came from the RV manufacturer. Picture two is the same compartment loaded with all the new batteries and electronics.
Batteries:
There's a difference of opinion whether 12-volt or 6-volt batteries are best to use in a RV. I found a good explanation from the discussion group found on the Northern Arizona Wind & Sun web site. Here's a text file with this good explanation of selecting 6-volt or 12-volt batteries. I went with 6-volt. The six batteries were installed in two separate locations. I replaced the two Trojan lead-acid batteries with two Lifeline AGM batteries. This battery location is under the stairway. Less than two-feet away, is the electronics compartment. This compartment held the electronics and 12v converter for the RV. Although not made for it, It is large enough to also hold six additional batteries. I removed the converter, and installed the ProSine inverter, inverter breaker box, fuse, solar controller, DC breakers, and the monitor shunt in this compartment. The primary reason for using AGM batteries was to also install them in this same compartment with all of the electronics. With the AGM batteries, there's no worry of lead acid, corrosion, or of venting issues. The AGM batteries are 100% sealed and are certified to be installed with electronics or in a living compartment. I installed the remaining four AGM batteries here, with space left to add two more. Using six 6-volt batteries in two separate compartments .jpg) required the batteries to be wired series in pairs to create a 12-volt pair, then in parallel to create the 660 amps. This required a little planning to insure I properly wired the system. This diagram shows how the battery wiring was accomplished. I used 2/0 welding cable for most battery connections. 4/0 cable to create the 12v pairs, only because I had previously purchased it. The inverter is connected to the battery bank with 16" of 2/0 wire. I attempted to use 4/0 wire from the inverter, but the 400 amp catastrophe fuse wouldn't accept the larger wire. Installing the 2/0 12-volt welding cables to the batteries was fairly simple. I bought 40' of the 2/0 welding wire from a welding supply store. Lucky for me, they had remnants laying around at a good price. This allowed me to make the battery cables to the exact length. Not too long, and not too short. This kept the battery wiring neater, although I would have preferred to have red cable for the positive connections, instead of all black. I insured I made a good crimp, and used heat-shrink on all connections.
required the batteries to be wired series in pairs to create a 12-volt pair, then in parallel to create the 660 amps. This required a little planning to insure I properly wired the system. This diagram shows how the battery wiring was accomplished. I used 2/0 welding cable for most battery connections. 4/0 cable to create the 12v pairs, only because I had previously purchased it. The inverter is connected to the battery bank with 16" of 2/0 wire. I attempted to use 4/0 wire from the inverter, but the 400 amp catastrophe fuse wouldn't accept the larger wire. Installing the 2/0 12-volt welding cables to the batteries was fairly simple. I bought 40' of the 2/0 welding wire from a welding supply store. Lucky for me, they had remnants laying around at a good price. This allowed me to make the battery cables to the exact length. Not too long, and not too short. This kept the battery wiring neater, although I would have preferred to have red cable for the positive connections, instead of all black. I insured I made a good crimp, and used heat-shrink on all connections.
Inverter:
I wanted the ability to operate all AC devices (except the air conditioners), including the microwave from the inverter. It looked like I would need a 2500 watt inverter. I also wanted a true sine-wave inverter, to eliminate ay compatibility problems or interference with the TV, Internet, or computers. The Xantex ProSine 2500 watt inverter was the obvious choice. However, I also wanted the advanced remote display panel, which was an option for the 2500 watt ProSine. For only $50 more than the 2500 and optional panel, I got the ProSine 3000 watt inverter, which included the advanced display panel. Mounting the 3000 watt ProSine inverter presented a small challenge. The previous converter that came with the RV, was installed on a small shelf in the compartment. But the inverter was much wider and didn't completely fit on this same shelf. I used a 36" x 1 1/2" metal bar, 1/4" thick as a mounting bracket. Half of the inverter rests on, and is bolted to the shelf. The other half sticks out and is bolted to this metal bar, acting as a support. This metal bar basically created a shelf for the inverter, with the battery bank underneath.
I wanted the Inverter to provide AC power to all electrical outlets, the microwave, and to the refrigerator. This involved replacing the optional washer/dryer circuit breaker with a 30amp breaker for power to the Inverter. Then I had to remove four 15amp circuits and extend this wiring to a new inverter breaker box. I ran #10 Romex wire to the inverter, and #12 Romex wire for the circuits to a new breaker box installed in the electronics compartment. To prevent problems, I installed this new AC wiring in conduit. Besides installing all of this in 113 degree summer heat, the hardest part was getting the conduit and wiring to the original breaker box. In my rig, the breaker box is above the holding tanks. There was no easy way to physically reach this area from underneath. Using the stiff plastic conduit, I was able to eventually get the wire to the breaker box. I had originally planned to use 3 lengths of conduit, 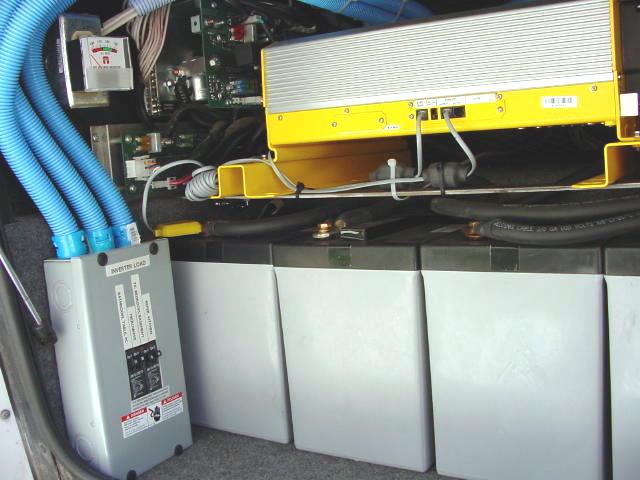 doubling up on the wire. But I had so much trouble, I took the easy route and ran 5 individual conduits with 1 wire each. The conduit runs inside the basement, strapped up out of the way, then enters the electronics compartment. A 400 amp catastrophe fuse was used inline between the inverter and the positive feed to the batteries.
This photo shows the inverter, additional 4 AGM batteries, and the new breaker box for the inverter loads.
Solar Panels:
I wanted large photovoltaic panels, but not too large. Since I could get a good price on them, and they met my requirements, I purchased 4 Kyocera 120-watt panels for $460 each. I also wanted the ability to tilt the panels towards the sun in the Winter, so I bought brackets for these panels from RV Solar Electric in Arizona. I mounted the panels to the roof to allow maximum exposure to the sun, without any shadows over them. To achieve this, I'll need to park the RV facing West to prevent the A/C covers from casting a shadow on the panels. I also have room left on the roof to install 2 more panels.
To insure the least amount of amperage was lost due to the wire run, I used sun resistant, burial grade dual encased AWG 8 gauge wire. The panels were wired in series to achieve a maximum output of over 28 amps at 16.9 volts.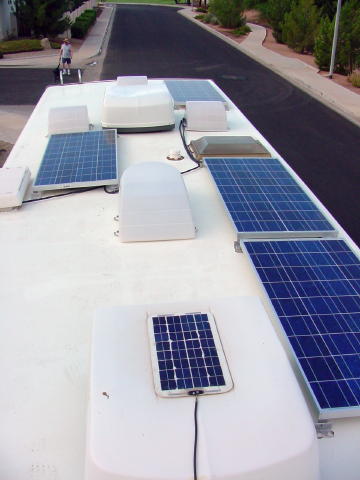 I encountered difficulties with finding terminal lugs for the AWG 8 wire, and in running the wire from the roof to the electronics bay. After looking in 5 hardware, electronics, and automotive stores, I finally found the terminal lugs at an ACE hardware store. I knew the popular method to get the wire down from the roof was to go through the refrigerator vent. On my first attempt, I tore up the bug screen on this vent trying to get the wire down past the fridge. I then took the vent completely off (20+ screws). It would have been an easier job if I used thinner wire, but I was determined. I ended up running fish tape down the vent from the top. Eventually, I was able to pull the cable up the vent - whew! I bought rain gutter screen and repaired, re-installed my vent, and re-caulked everything back up. After running the wire to the electronics bay, during mid day I measured 17.2 volts DC with 24 amps on the open circuit.
Solar Charge Controller:
Research taught me to insure I used a Pulse Width Modulation (PMW) multistage charge controller. The charge controller's job is to control the charging of the batteries from the solar panels. Depending on the state of charge of the batteries, the controller will "Bulk" charge the batteries, then taper the charge down to an "acceptance" (or absorption) charge, and finally "float" the charge once the batteries are charged. With AGM batteries, it's also very important to NOT over charge them. I also needed a controller that could handle my 28.4 amps (max possible) from my 4 solar panels. I could have selected a 30 amp controller, but this wouldn't allow for any simple expansion of the system. I decided to use the Solar Boost 50, which can handle up to 50 amps. It also has the advantage of being a Maximum Power Point Tracking (MPTT) charge controller. Basically, this technology can increase the charge current up to 30% compared to a traditional controller. Simply put, the solar panels put out 16.8 volts. But the batteries use a maximum of 14.3 volts to charge. MPTT technology converts this extra voltage to additional amperage for charging. For example, the solar panels may be putting out 20 amps, but the charge controller could boost this to 26 amps to the batteries.
I also installed two 50 amp breakers to the charge controller. One is between the solar panels and the controller; the other is between the batteries and the controller. Not only is this a safety feature, it enables me to easily 'turn off' the solar panels for maintenance.
The picture shows the Solar Boost 50 charge controller, the two DC breakers, the shunt for the Battery meter, and the 400 amp catastrophe fuse (hard to see).
Remote Displays:
The Prosine 3.0 Inverter came with their 'Advanced Control System' remote display. I ordered the Solar Boost 50 with it's optional remote display. A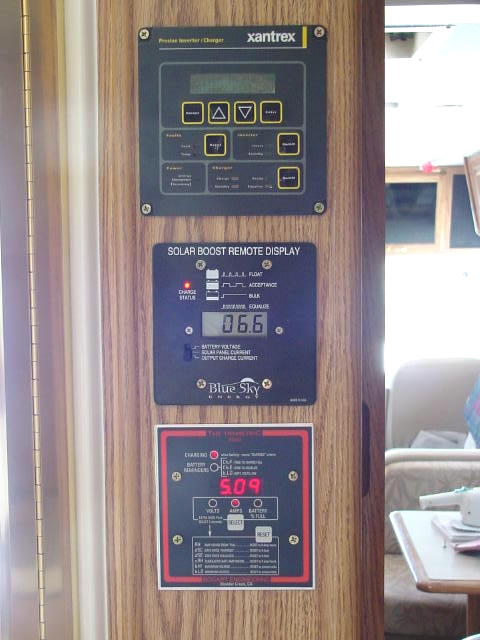 lthough not needed, I also installed a TriMetric 2020 Battery Monitor to primarily monitor the usage and exact condition of the batteries. Finding a suitable location to install these three displays presented a challenge. I wanted them to be close to the existing controls for the RV (fan, A/C, tank levels, etc). After reviewing my options, I installed the three new controls on a side panel next to the existing controls. The wiring uses the same path as the new conduit for the inverter breaker box. Again, installing these three small wires wasn't an easy job. After a few failed attempts, Connie and I finally were able to run 'fish tape' from a small hole in the floor. From there on, it was easy to pull the wires to from the panel location to the electronics bay.
.jpg)
Follow